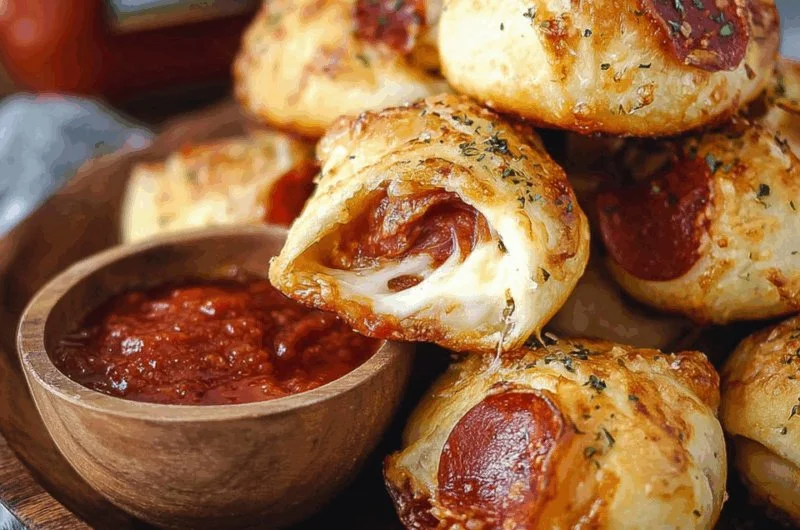
Irresistible Pepperoni Cheese Bombs: A Delightful Snack
Are you ready to elevate your snacking experience? Look no further than the mouth-watering world of Pepperoni Cheese Bombs! These delightful bites are packed with flavor and make for the perfect appetizer or party snack. Whether you’re hosting a game night, movie marathon, or simply craving a cheesy treat, these cheese bombs are sure to impress.
What Are Pepperoni Cheese Bombs?
Pepperoni Cheese Bombs are little pockets of joy that combine gooey cheese and savory pepperoni, all encased in a golden, flaky dough. They are easy to make and can be customized to suit your taste buds. Each bite offers a burst of flavor, making them a favorite among cheese lovers and pepperoni enthusiasts alike.
Ingredients You’ll Need
To whip up a batch of Pepperoni Cheese Bombs, you will need the following ingredients:
- Pizza Dough: You can use store-bought dough or make your own for an added touch.
- Pepperoni Slices: Choose your favorite brand for the best flavor.
- Mozzarella Cheese: Shredded or cubed, mozzarella provides the melty goodness.
- Parmesan Cheese: For an extra layer of flavor.
- Italian Seasoning: A blend of herbs like oregano, basil, and thyme.
- Garlic Butter: Melted butter infused with minced garlic for brushing.
- Marinara Sauce: For dipping, adding a tangy contrast to the cheesy bombs.
How to Make Pepperoni Cheese Bombs
Step 1: Prepare Your Dough
If you’re using store-bought pizza dough, roll it out on a floured surface until it’s about 1/4 inch thick. If you’re making your own dough, follow your favorite recipe to create a soft and pliable base.
Step 2: Fill the Dough
Cut the rolled-out dough into squares, typically around 3 inches by 3 inches. Place a slice of pepperoni and a spoonful of mozzarella cheese in the center of each square. For added flavor, sprinkle a little bit of Italian seasoning on top of the cheese.
Step 3: Seal the Bombs
Fold the corners of the dough squares over the filling and pinch the edges to seal them tight. You want to ensure that the filling stays inside during baking.
Step 4: Bake to Perfection
Preheat your oven to 400°F (200°C). Place the sealed cheese bombs on a baking sheet lined with parchment paper. Brush them with the melted garlic butter for a beautiful golden crust. Bake for about 15-20 minutes or until they are puffed and golden brown.
Step 5: Serve and Enjoy
Once out of the oven, let them cool slightly, then serve with warm marinara sauce for dipping. Enjoy the cheesy, pepperoni goodness with family and friends!
Customization Ideas
One of the best aspects of Pepperoni Cheese Bombs is their versatility. Here are some customization ideas to suit your preferences:
- Add Veggies: Incorporate diced bell peppers, olives, or even jalapeños for a touch of spice.
- Vary the Cheese: Try different cheeses like cheddar, gouda, or provolone for a unique twist.
- Herbs and Spices: Experiment with different seasonings such as red pepper flakes or crushed garlic.
Conclusion
Pepperoni Cheese Bombs are not only easy to make but also incredibly satisfying to eat. Their warm, cheesy center and crispy exterior make them a standout choice for any gathering. With endless possibilities for customization, you can easily adapt this recipe to match your preferences or the occasion. So, gather your friends and family, and dive into the delightful world of Pepperoni Cheese Bombs—you won’t be disappointed!